Monday, February 15, 2010

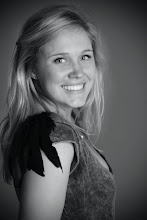
I was so excited to do my photo shoot! I knew exactly where i wanted to go and what image i needed to portray to get it right. I wanted to capture the strength that Annette Kellermann portrayed as an independent woman. Kellermann was so powerful in many ways but also mysterious because she had a beautiful feminine side as well as being a strong woman. I felt that these photos really portray the image i wanted to capture...


I wanted to have a beach photo shoot because that's where you generally wear swimsuits. The strong poses and the cloudy background make the photo look strong but mysterious at the same time like Annette Kellermann. It was such a fun shoot, it was lovely weather as well with the wind blowing slightly and the clouds really just gave the picture this magical essence. I love it!!!

I really enjoyed doing this assignment i learnt so many knew things and learning about Annette Kellermann and her life made such a big impact on me realising that anything is possible if i really want to do something. Kellermann is a legend in my books and forever will be!
After a grueling day yesterday i was ready to begin applying my strap. i had already overlocked the neckline so i just needed to zigzag the strap in which wasn't to much trouble. Then it came to my shoulder pads and i still had no idea what method i was going to use to attach them and what materials i was going to use to create the padding. All i knew was that i wanted the plastic in it to give it the structured look i wanted.

After much deliberation i decided to use a thin wadding because it looked really nice and it was just the right amount of padding i wanted. After i decided what i was doing i cut out the wadding and plastic shapes and inserted it into the shoulder pad to see if it fir properly. I then overlocked the wadding in place and then sewed a pocket for where the plastic would be inserted. After everything fit into place i pinned to see how it would look. I noticed that the seam inside the shoulder pad had rolled onto the top side and had created a bulky layer. To solve this problem i pulled the bottom piece of the shoulder pad so the seam would roll under like i had done with the hip pad. It was lucky i was using stretchy fabric because it wouldn't have rolled under if it wasn't! Pinning the seams in place i carefully sewed up the shoulder pad and trimmed away the excess seam allowance.

I wasn't really sure how i was going to attach the shoulder pad onto the strap but i eventually figured out a way! I sewed the wrong side of the shoulder pads seam allowance to the wrong side of the strap and then flipped in over so the shoulder pad sat on top and you couldn't see any of the seams on the side or underneath. Once the other was sewn on i was ready to finish off my leg holes and organise myself for the photo shoot!!! So excited...the end is near!!!! :D
When i had started to cut mine out there was a line up so i was stressing out about that and worrying about how much time i had, i looked like a wreck and it was so hot that the our lecturers would say go home, it was literally like a sweat shop!

I finally got to cut out my garment and once i had finished i was straight on the machines sewing it all together which didn't really take that long until i got to my first problem!!!

Right before i began cutting out my leather fabric my lecturer pointed out that my seam was puling to the front and it didn't look very good. I then had to change my pattern piece so the bottom one was 1 to 2cm smaller so that it would sit underneath without pulling through to the top.

I had some difficulty sewing the plastic into the fabric to get the hip pad shape that i wanted. In the end i got it done and i had to trim off some excess fabric. The seam sit really well underneath the top as well! Then another problem came up which was a very frustrating time consuming problem. I didn't have a seam above my hip pad which would have been easier but i wanted to have bare skin because it looked better. The seams were visible and it looked bad so my lecturers and i were thinking of ways how i could hide it. The only thing we could think of was that i would have to self bind those edges. The edges were .5cm in width which meant that it was going to be a very fiddly job. It was a very tricky trying to roll the binding i had cut underneath and getting it to stay!

I was there for about 3 hours until i finally finished both bindings on each of the hip pads but in the end it was well worth the time because they look amazing!!! I'm so happy with it and myself because it was so difficult and i was ready to throw it all away because i just couldn't be bothered! Its true what they say, patience is a virtue!
I felt really good about the hip pads and how they turned out and i knew what to do when it came to producing the good garment but when it came to the shoulder pads it became a little tricky! I had to make a strap which would then connect to the shoulder strap...


After attaching the strap i decided to plan out which way was the best way to connect the shoulder pad to the strap. This took me a while which started to frustrate me and i was running out of time at this point so i decided to begin cutting out my good garment and worry about it when i got to it! Hope everything goes well!!!

Now that i have the correct size for the card to fit in to the shoulder and hip pads i can begin to add the pads to the toile and play around with them. I think its going to be a little bit complicated though because i have never tried anything like this before!

Finally, after about an hour i put the first one in which looks great! When i do the real garment I'm going to pull the fabric tighter so it sits much stiffer and creates the shape that i want in my design.


Sunday, February 14, 2010

Finished my pattern making and now I'm ready to start my toile! We're using this brown jersey which is similar to the black wool/lycra which is good so we don't need to go back and change much to our patterns if we make a mistake.

I overlocked to main body parts together just so i knew i had gotten the shape right, lucky i did because it was a bit skimpy around the boob area :P

I then cut out some thick card board and attached them just with pins to the mannequin so i could get the shape right for the shoulder and hip pads. I only decided to do one side because if the shape wasn't right then i could just alter one instead of all of them which is time consuming!


After doing some slight alterations to the shoulder and hip pads i wanted to see what it looked like which all 4 attached. Already i could see the shape it was creating on the mannequin and i was loving it!!! But it looked even better when all 4 were attached and some of my friends commented on it which made me feel really good about my design :)


I started pattern making today!!! I feel good because a lot of people are taking a while to choose there designs. I really like my design i cant wait until its all finished!